Speed up programming language writing with emmet
Rahmat Subandi / 26 August, 2021
7 min read • ––– views •

Introduction
Do you often write code? Surely you feel tired if you continue or even often write long code, right? In this article we will learn what emmet is, how it works, and of course how to use emmet.
What is discussed this time is only emmet for HTML only.
What is Emmet?
Emmet is a plugin that can be used in Visual Studio Code and other text editor software. Emmet functions to speed up writing our programming languages, such as Java Script, PHP, and many more, even HTML and CSS c
How does Emmet work?
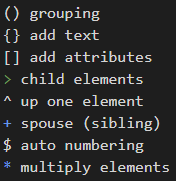
When we are writing HTML code we will definitely need time to type all the tags, attributes, brackets, quotes, etc. But in emmet, we don't need to write everything down, just a few words, all the tags we want can be created automatically. The following are the main symbols in emmet:
How to Use Emmet
How to use emmet is actually very easy, we just need to write a few words and then just press TAB on the keyboard. For a complete example, please see the method below:
Abbreviations Syntax
Emmet uses syntax similar to CSS selectors for describing elements positions inside generated tree and elements attributes.
Elements
You can use elements names like div or p to generate HTML tags. Emmet doesn't have a predefined set of available tag names, you can write any word and transform it into a tag: div → <div></div>, foo → <foo></foo> and so on.
Nesting operators
Nesting operators are used to position abbreviation elements inside generated tree: whether it should be placed inside or near the context element.
Child: >
You can use > operator to nest elements inside each other:
div>ul>li
will produce:
<div>
    <ul>
        <li></li>
    </ul>
</div>
Sibling: +
Use + operator to place elements near each other, on the same level:
div+p+bq
will output:
<div></div>
<p></p>
<blockquote></blockquote>
Climb-up: ^
With > operator you're descending down the generated tree and positions of all sibling elements will be resolved against the most deepest element:
div+div>p>span+em
will be expanded to:
<div></div>
<div>
    <p><span></span><em></em></p>
</div>
With ^ operator, you can climb one level up the tree and change context where following elements should appear:
div+div>p>span+em^bq
outputs to:
<div></div>
<div>
    <p><span></span><em></em></p>
    <blockquote></blockquote>
</div>
You can use as many ^ operators as you like, each operator will move one level up:
div+div>p>span+em^^^bq
will output to:
<div></div>
<div>
    <p><span></span><em></em></p>
</div>
<blockquote></blockquote>
Multiplication: *
With * operator you can define how many times element should be outputted:
ul>li*5
outputs to:
<ul>
    <li></li>
    <li></li>
    <li></li>
    <li></li>
    <li></li>
</ul>
Grouping: ()
Parenthesises are used by Emmets' power users for grouping subtrees in complex abbreviations:
div>(header>ul>li*2>a)+footer>p
expands to
<div>
    <header>
        <ul>
            <li><a href=""></a></li>
            <li><a href=""></a></li>
        </ul>
    </header>
    <footer>
        <p></p>
    </footer>
</div>
If you're working with browser's DOM, you may think of groups as Document Fragments: each group contains abbreviation subtree and all the following elements are inserted at the same level as the first element of group.
You can nest groups inside each other and combine them with multiplication * operator:
(div>dl>(dt+dd)*3)+footer>p
produces:
<div>
    <dl>
        <dt></dt>
        <dd></dd>
        <dt></dt>
        <dd></dd>
        <dt></dt>
        <dd></dd>
    </dl>
</div>
<footer>
    <p></p>
</footer>
Attribute operators
Attribute operators are used to modify attributes of outputted elements. For example, in HTML and XML you can quickly add class attribute to generated element.
ID and CLASS
In CSS, you use love#id and love.class notation to reach the elements with specified id or class attributes. In Emmet, you can use the very same syntax to add these attributes to specified element:
div#header+div.page+div#footer.class1.class2.class3
will output:
<div id="header"></div>
<div class="page"></div>
<div id="footer" class="class1 class2 class3"></div>
Custom attributes
You can use [attr] notation (as in CSS) to add custom attributes to your element:
td[title="Hello world!" colspan=3]
outputs:
<td title="Hello world!" colspan="3"></td>
- You can place as many attributes as you like inside square brackets.
- You don't have to specify attribute values:
td[colspan title]will produce<td colspan="" title="">with tabstops inside each empty attribute (if your editor supports them). - You can use single or double quotes for quoting attribute values.
- You don't need to quote values if they don't contain spaces:
td[title=hello colspan=3]will work.
Item numbering: $
With multiplication * operator you can repeat elements, but with $ you can number them. Place $ operator inside element's name, attribute's name or attribute's value to output current number of repeated element:
ul>li.item$*5
outputs to:
<ul>
    <li class="item1"></li>
    <li class="item2"></li>
    <li class="item3"></li>
    <li class="item4"></li>
    <li class="item5"></li>
</ul>
You can use multiple $ in a row to pad number with zeroes:
ul>li.item$$$*5
outputs to:
<ul>
    <li class="item001"></li>
    <li class="item002"></li>
    <li class="item003"></li>
    <li class="item004"></li>
    <li class="item005"></li>
</ul>
Changing numbering base and direction
With @ modifier, you can change numbering direction (ascending or descending) and base (e.g. start value).
For example, to change direction, add @- after $:
ul>li.item$@-*5
outputs to:
<ul>
    <li class="item5"></li>
    <li class="item4"></li>
    <li class="item3"></li>
    <li class="item2"></li>
    <li class="item1"></li>
</ul>
To change counter base value, add @N modifier to $:
ul>li.item$@3*5
transforms to:
<ul>
    <li class="item3"></li>
    <li class="item4"></li>
    <li class="item5"></li>
    <li class="item6"></li>
    <li class="item7"></li>
</ul>
You can use these modifiers together:
ul>li.item$@-3*5
is transformed to:
<ul>
    <li class="item7"></li>
    <li class="item6"></li>
    <li class="item5"></li>
    <li class="item4"></li>
    <li class="item3"></li>
</ul>
Text: {}
You can use curly braces to add text to element:
a{Click me}
will produce:
<a href="">Click me</a>
Note that {text} is used and parsed as a separate element (like, div, p etc.) but has a special meaning when written right after element. For example, a{click} and a>{click} will produce the same output, but a{click}+b{here} and a>{click}+b{here} won't:
<!-- a{click}+b{here} -->
<a href="">click</a><b>here</b>

<!-- a>{click}+b{here} -->
<a href="">click<b>here</b></a>
In second example the <b> element is placed inside <a> element. And that's the difference: when {text} is written right after element, it doesn't change parent context. Here's more complex example showing why it is important:
p>{Click }+a{here}+{ to continue}
produces:
<p>Click <a href="">here</a> to continue</p>
In this example, to write Click here to continue inside <p> element we have explicitly move down the tree with > operator after p, but in case of a element we don't have to, since we need <a> element with here word only, without changing parent context.
For comparison, here's the same abbreviation written without child > operator:
p{Click }+a{here}+{ to continue}
produces:
<p>Click</p>
<a href="">here</a> to continue
Notes on abbreviation formatting
When you get familiar with Emmet's abbreviations syntax, you may want to use some formatting to make your abbreviations more readable. For example, use spaces between elements and operators, like this:
(header > ul.nav > li*5) + footer
But it won't work, because space is a stop symbol where Emmet stops abbreviation parsing.
Bonus for CSS
For emmet in CSS you can try it as follows:
body{
  mt10+pt10+mb30
}
produces:
body {
    margin-top: 10px;
    padding-top: 10px;
    margin-bottom: 30px;
}
Say bye!
We have finished what we have learned on this occasion. How? This Emmet really helps us in speeding up writing programming code, right?
Actually, there are so many and long if we discuss in its entirety about this emmet. Also you already know that emmet is not only in HTML, but emmet can also be used in CSS, Javascript, PHP and others.
In closing, I say thank you very much. Excited to learn it!
References
For Emmet's complete cheatsheet, you can read it here: